Saturday, 25 January 2014

Vegan Chilli con carne

Serving suggestion
Dinner for 2
Ingredients:
·         1 tin of kidney beans - rinsed
Some of the ingredients for the dish
·         1 tin of tomatoes
·         1 medium onion - chopped
·         4 cloves of garlic - chopped
·         ½ a red pepper and ½ green pepper – roughly cut
·         1 teaspoon of cumin powder
·         1 tea spoon coriander powder
·         A bit of black pepper
·         2 small chilli peppers
·         Thyme
·         Small bunch of parsley
·         Rapeseed oil
·         1 stock cube melted in 250ml of water
·         20 medium soya meatballs
·         1 cup of barley
 
Method:
Start by soaking the meat balls in boiled and salted water for 10 minutes. After 10 minutes squeeze out the water and cut them as they would have doubles size.
 
In a hot pan with 3 table spoons of rapeseed oil fry the chopped onion with thyme for 2 minutes and add the meatballs with garlic, salt and black pepper and fry until the meat has absorbed the flavours. This should take 5 minutes.
 
When the meat is brown, add the green and red peppers, the tomatoes, the cumin and the coriander. Cover and let simmer for 10 minutes. Now add the kidney beans with the chillies and 250ml of vegetable stock, stir, cover and let the beans absorb the flavours for 15 minutes. Don’t forget to stir from time to time so the bottom of the pan don’t burn. Taste and adjust the seasoning if necessary
 
In the meantime, rinse the barley and to remove the starch covering it. Please it in a pan and cover with water. Barley can be hard to cook. So, water is 2 measures for 1 measure of barley. Here we’ve got 1 glass of barley so, 2 glasses of water will be needed to cook it. Also add 1 teaspoon of oil and a bit of salt. Then, leave the pan open and let the water evaporate for 15 minutes on high heat. There should be a little bit of water left. After 15 minutes stir the barley, put the heat to low and cover the pan. This will allow the barley to finish cooking with steam mainly for another 10 minutes. Just before serving, add the finely chopped parsley.
 
Note: Did you know that parsley is a great source of antioxidants, folic acids, vitamin K and C? I didn’t know that, but I love parley!
 
Yummy!

Sunday, 19 January 2014

Chestnut and Broccoli Salad


Serving suggestion
This dish could be a starter, but it is great for lunch with a little glass of wine.

Ingredients:
Ingredients for the salad
·         1 medium onion
 ·         A hand full of crinkled beetroots
·         5 whole chestnuts in brine
·         1 green pepper
·         1 medium tomato
·         About 200 grs of broccoli
·         A hand full of roasted almond flakes.
·         A pinch of thyme and salt

Method:
Start finely cut the whole onion and fry with a pinch of salt and the thyme. Once the onion is brown, set aside and leave to cool down.

Floret the broccoli, cut the crinkled beetroots, roughly cut the chestnuts, the green pepper and the tomato.

Place all the above in a bowl and toss. Then, add the fried onion and crush the roasted almonds on the lot, mix well and serve.

No need for a vinaigrette here. The fired onion and the flavouring from the crinkled beetroot in some ways removed the need for a vinaigrette for this dish.

Enjoy.

Saturday, 30 November 2013

Savoury corn cookies with pineapple sage


The great thing about playing in the kitchen is that you get to discover stuff along the way. I tried to make my version of corn bread, but it turned to soft savoury corn cookies served with a ginger and garlic pulses mix.

So, to make the corn cookies the ingredient s are:

·         1 ½ coarse corn meal

·         1 cup of flour

·         1 cup of rice milk

·         1/3 cup of corn oil

·         1tea spoon of baking powder

·         1tea spoon of salt

·         1tea spoon of sugar

·         5 leaves of pineapple sage leaves

In a bowl, mix the milk, oil sugar and salt add the corn mix well, then add the flour. Work the paste into an homogenous ball and wrap it in cling film and leave in room temp for 30 minutes.
Then, unwrap and crush in the fried pineapple sage leave. Work the past once more to incorporate the sage. Then, divide the dough in smaller balls and flatten them ready for the oven.

Spray the oven tray or baking dish being used for the baking with corn oil and place the
Preheat the oven at 180c and place the cookies in to bake for 35 minutes.

Meanwhile, prepare the accompaniment and get it ready for serving the cookies warm.
My accompaniment is a moist pulses mix including butter beans, kidney beans, barlotti beans and chick peas cooked with soya meatballs in plenty of garlic, onion and ginger.

The cookies need improvement, but this tasted not bad at all… will do better next time…and intentionally.
 
See you later!


Saturday, 16 November 2013

Spaghetti plant carbonara with avocado cream

Shaz pic of the monster - Also called spaghetti squash
Before my friend Shaz mention this the Spaghetti plantvegetable, I have never heard of the thing. Her dad grew this in the allotment and she gave me half of the monster so I can create something original. I came up with a vegan version of carbonara.
 

This dish was created completely off hand and for the first time as are most dishes on this blog.

Ingredient for 3:
200g Spaghetti plant (cooked & deseeded)
2 ripe small avocados
100 red cabbage
50g of whole dried Shiitake mushrooms
1 medium onion
100 ml of rice milk
5 garlic cloves
Sunflower oil
1 stock cube

 Prep:
1 - Cut the spaghetti plant in big wedges so they can fit in a single pot. Place the wedges in the pot face up with just enough water to produce steam. Cover the pot and steam for 20 minutes. When this vegetable is cooked it actually become stringy like very thin spaghettis.
Ready avocado cream
2 - Remove the veges from the stove and let cool down. Once cooled. Take it apart and remove the pips then, separate the strings and rinse out all the starch. Squeeze out the water and set aside.

3 - Now peel the avocadoes, chop a put in a mixer. Add the rice milk and the peeled garlic cloves. Blend and set aside.
4 - As for the Shiitake mushrooms, remove them from the package and place in a bowl with the stock cube. Pour over it about 150ml of boiling water. Leave to hydrate for about 30 minutes, then remove from the water and roughly cut them in 3 or 4 pieces each. Do not throw away the water as it will be used in the cooking later.

5 - Take about 10 leaves of red cabbage and slice them finely. Set aside do the same for the onion.
Method:
In a hot wok, heat 4 table spoons of sunflower oil, throw in the finely slices onion and brown for about 2 minutes. Drop in the mushrooms with a pinch of salt continue to stir, then add the chopped cabbage and the stock. Cover and let simmer for 5 minutes.

By now the mushrooms and cabbage should be well flavoured. Now, add the “spaghetti” and mix well adding black pepper and adjust the salt. Add the avocado cream and mix well making sure that the cream is well incorporated.

Cover the pot, and turn the heat down. Keep an eye on it and stir from time to time to allow the liquid from the cream to dry out a bit. By now, the cream should be sticking to the other vegetable in the pot. 

After the avocado cream is incorporated, the pot should only remain on the fire for about 5 minutes as everything goes so quick.
It is ready.
Serving suggestion
Note: This dish tasted really good! Using avocado as cream really came up in a dream (I know crazy right?), but, I had never heard of it before. I will definitely use avocado in other dishes that call for cream in the future. The texture is really original and the shiitake mushroom gave the chewiness needed in such dish. I am really surprise that the spaghetti plant despite the cooking and the manipulation didn’t disintegrate… Wow. Two unknown in ingredients, one great dish!

Sunday, 3 November 2013

Homemade tomato conserve

Often we buy fresh tomatoes and never get round to use all of the pack and it start to go off in the fridge. When my tomatoes start to go off, I either make a soup or my conserve of tomatoes that I use in many ways.

You will find in the post how I make my conserve and in the next ones you will see how I sue the conserve that can last up to a month.

To make the conserve you will need the following:

 6 medium tomatoes
2 medium red onions
10 garlic cloves
1 teaspoon of black pepper
1 teaspoon of salt
Olive oil
Fresh thyme – 3 twigs

Method:
1 - Start by Peeling and chopping the garlic and onions. Rinse the fresh tomatoes and cut off any rotten bits, then chop the tomatoes and set aside. It is preferable to keep all the elements separated as you will incorporate them separately.

2 - In a sauce pan, heat 5 table spoons of olive oil, then fry the onions and thyme for 2 minutes. Now add the fresh tomatoes and the garlic and cook for 5 minutes. Then, add the tinned tomato, salt and pepper. Mix well and cover to simmer for another 5 minutes. Stir and do not let the sauce stick to the bottom of the pan. Stir until there is no more moisture in the pan. All you should see in the bottom of the pan is the paste and oil.

Letting all moisture evaporate will mean that the conserve /chutney lasts longer. So you must make sure that all you hear from the pan frying noises.
 
3 - Remove the pan from the stove and leave to cool before putting the conserve in a dry glass jar with lid. Again, make sure that the jar and it lid have not a sign of moisture inside.

Once the tomato is in the jar cover it with 2 o 3 more table spoons of olive oil.

With the ingredients above you can produce up to 600 grams of tomato chutney. I splited mine and blended a half and kept the other half in chunks and in separated jars.

Note: Oil is a great conservateur and will protect whatever you cover with it from moulding.
You can then also use the oil covering the tomato to flavour some of your salads or roasts.
Whenever you want to use your conserve, make sure you only use clean and dry spoons. This way, you will not insert moisture or bacteria in your jar and will be able to keep it for at least 21 days.

Check out next week’s post to see how to use the conserve in quick and easy vegan dishes.

Ciao!

Saturday, 26 October 2013

Intro to my cooking oils 2/ 2

Part 2/2 Hazelnut, Walnut, Almond, sesame seeds, ground nut, palm oil.

Hazelnut oil… The thing with this oil is that it always reminds me of a Starbucks coffee I used to love… If I am not careful, I will end up drinking this oil like wine… the taste of hazelnut is so strong, it is amazing. This is probably due to the quality of the oil. I got this one from Marks and Spencer’s. It is great for baking (used as a replacement for butter). ; It can also be used to drizzle on Salads if you are using chopped nuts and flash frying. Hazelnuts are apparently rich in vitamin B6, B and proteins… suppa duppa. I like that! Try it in your homemade pesto the next time… fry you pancakes with it… so yummy!

Walnut oil. I was really surprised to find this one, again from Marks and spencer’s. The taste isn’t that strong and I rather use it in Salads. The taste of walnut is so light that and heating it might just lose it. So, I just use it raw and … sparingly. 250ml costs between £2.00 and £5.00 depending where you shop. It is worth having it handy. The bottle can last up to six months if you are being really economical with it.

Almond oil. Growing up, I used this oil to moisturise. When I saw it on the food aisle it was a “ding” moment… I love almonds, but I was disappointed by the oil… I can’t taste the nuttiness in it. Not sure it really plays role in my collection of oils, but it is a worthy replacement for vegetable oil or rapeseed oil. It is not as expensive as the hazelnut or walnut oil, but, it is not available everywhere either. The Turkish shop and the Indian shop round the corner will have it in stock.


Toasted sesame oil. Now I love sesame, and if I could I would include it in all my baking and salads. But, for the sake of diversity…, I swap it for poppy seeds. Been a fan of this tiny little seed for ages. It was only natural that its oil should be included in my collection. The toasted sesame oil REALLY does tastes like TOASTED sesame… the taste is so strong, it would be a pity to heat it up for frying and lose all that taste. I recommend using it to finish off vegetable dishes and salads. It is widely used in south India, and I am sure that you have spotted it In the Japan centre in regent Street London.
Ground nut oil. That is peanut oil or monkey nuts oil… not sure why this one has so many names… This oil is widely used in Asia and West Africa and is great for deep frying… Doughnuts and French fries. I bet this oil is much cheaper in Africa than it is here. I use it very sparingly in most cooking. I will not us it for deep frying because of its cost. It is apparently used as a biodiesel in some countries. It is a good one to have in the collection.


Palm Oil. Get this, you can find palm oil in Nutella and a lot of Palmolive products! Did you know that? I love the taste of this oil but, regular consumption of it isn’t recommended in this British climate which is very cold at times. This oil tends to coagulate very easily and is best suitable for really hot climates... Asia, south American and Africa.
It really really taste nutty, has the colour of saffron and colours everything it comes in contact with. If you are reading this based in the UK, you will not find it in supermarkets unless they have a world foods aisle like big Tesco supermarkets. Otherwise you may find it again, in the Turkish and Indian shops. I recommend the Nigerian variety as its colour seem to be the best and it stays liquidly for longer.  This oil is suitable for types of cooking and stews in particular. Do not use it for salads as it will coagulate as it get in contact with cold items. This oil is amazing and contains a whole lot of goodness including Q10, Carotene and vitamin B6…
That it is, this is my collection of oil. I did came across corn oil and rice bran oils in the shop too. They sound amazing, but I am running out of space in my kitchen for now…
All those oils seem to be full of great things… how amazing. Just with this I might manage to stay away from my doctor for the next 12 months.
I really hope that you will try some of these oils. Do come back and let me know what you think.

Hey do not try any of it if you are allergic to NUTS!

See you soon!

Saturday, 19 October 2013

Intro to my cooking oils 1/2

Part 1/2 Mustard, Sunflower, Coconut, Olive & rapeseeds oil.

If just looking at oils makes you put on weight, better not read this post… IT AIN’T RECOMMENDED for you.
I have recently taken stock of my collection of oils. It turns out I am a collector… I would have preferred a wine collection to be honest, but there is only so much cooking that you can do with wine. Besides, I am really proud to be a collector of OILS… I don’t know anyone who collects them... Do you?

I am writing this post just to tell you about my oil collection and would like to invite you to try some of them… or should I say “dare you”.
I am going to start with the love of my life… Mustard oil! Mustard oil can be used for cooking although heating it up to fry onion for example might lose the oil’s Omega3 content. I like using it to finish a dish or on salads.
This oil is the bomb! If poured on a hot dish, you better step away as the heat/fumes from it will make your eyes water. This oil is as hot as chilli pepper and apparently it is really good for your health too. The last time I used it, it was do make a vinaigrette; getting the mustard taste and heat with actually using mustard. This oil can be expensive for every day cooking. So, use sparingly. 250 ml of this oil costs from £2.00 to £5.00

The next oil is Sunflower oil… every one’s got this in their kitchen. It is good for general cooking, frying and Also salads. Nothing to write home about. You will usually be able to buy a litter between £1.15 and £2.99.

Coconut oil. I bought this one because it sounded great but I am not that impressed with it. I have used it to cook soups, broths and sauces. I have then had to top them with coconut cream to feel the full hit of coconut. This oil is also used as a biofuel in some country ahaha. … Fear not! It is totally edible. It is also used as a moisturiser for dry skins and as a hair product… It coagulates quite easily (like butter) and has to be placed in a very warm environment before using. I do not recommend buying in bottle format, but in jar. That way, you can just spoon the quantity needed as in when.

Olive oil. Every one rants about this oil and it is almost as if other oils do not exist. And just because it is so widely used, it isn’t my favourite… I love being contrary. Yes I know it is great for health, but here in the UK, we are not in the freakin’ Mediterranean country and we should moderate our consumption… Chefs in UK TV cooking shows pour this oil on their dishes as if it was water… DO NOT COPY THEM! We do not share the same climate. God wasn’t a fool when he placed olive trees in the Middle East and Mediterranean!!!


Rapeseed oil. I quite like this one! It sounds great and make some wicked potatoes chips/French fried. I started using it because of it name and the 99p store used to sell a litre of it for £0.99p. Now, they sell it at the same price, but the bottle is much smaller (500ml)… Can’t fill my chip pan with this all the time… need to cut down on chips then.

See you next week for part with Hazelnut, Walnut, Almond, sesame seeds, ground nut, and palm oil.

Ciao!

Sunday, 13 October 2013

Marrow / potatoes layer with beet and sweet corn stir


Marrow & potatoes layer with beet and sweet corn stir


Serves 3

Ingredients for the layer:
600grs Marrow
2 medium potatoes
3 medium firm tomatoes
100grs Tofu sliced and deep-fried to give it texture
1 small red onion (optional)
3 cloves of garlic
30grs butter (dairy free)
100ml Alpro single cream
50grs Flour
Vegetable stock cube
White pepper
Salt

Preparations:
1 - Peel the marrow and keep the skin strips for decoration. Now slice the peeled marrow in 1cm width and set aside. Peel the potatoes and cut in slices about the size as the marrow. set aside. Now do the same thing for the tomato and red onion. Make sure that your Tofu is deep-fried as it will give texture to your dish. Set aside.

2 – for the batter: Melt about 25grs of the butter and crush the whole stock cube in it to melt it. Add the cream to the mix then add the flour and the finely chopped garlic. Mix well, add salt and white pepper. Set aside.

Preheat the oven at 180 degrees.

Layer ready for the oven
Method:
Butter a regular size loaf tin, place 1 layer of potatoes, then marrow, then onion, then tomatoes, then tofu.  Dust with a pinch of salt and white pepper. Then repeat the process. If you can, make sure that a layer of potato is at the top of the dish simply because you will use it as indicator to judge if the dish it cooked.

The dark green strips you see on this photo are strips of peels from the marrow that I am using to decorate my dish. The strips were placed on the bottom of the baking tin, then folded over the dish and held with tooth pick just before placing it in the oven.
Once the layers are done. Stir the batter previously prepared and pour it, not on top, but on the sides of the layers.

Now place your dish in the oven for 1hr 20 minutes.

Now time to prepare the accompaniment.

Beet & corn stir
For this, you will need:
1 big fresh sweet corn
1 precooked beetroot or a fresh one if you can find it
1 yellow sweet pepper
1 very small red onion
50grs roughly crush walnut
2 twigs of thyme
Fresh parsley
25grs Butter (dairy free)
Black pepper & salt obviously
 
Start by shelling the corn kernels from the cob or simply go through the cob with the knife like I did.

Chop separately all the elements of your dish then set aside.

Now, in a frying pan, melt the butter and fry the chopped onions and thyme until brown. Now, add the sweet corn and stir for 2 minutes. Then add the sweet pepper in the mix, stir for 2 minutes, add the beetroot and the fresh parsley, stir well for 1 minute and add the crushed walnut. Season with salt and pepper, Mix, cover and remove from the stove. It is ready.
 
Time to check on your layers in the oven. The hardest ingredient in the dish is the potato. If you put a knife through the dish and it goes through smoothly, and comes up just slightly moist, then your dish is ready. if not, add cooking time to your oven.
Please note: not all oven perform with the same power

Leave your dish to cool for few minutes then, serve.

Serving suggestion
Don’t forget to post a comment!

Bon appétit. 


Nash


Saturday, 5 October 2013

Nutty spinach with wedges

Alt name: Mouth-watering Hazelnut & Almonds spinach with potatoes wedges

Serving suggestion
Lunch for 1

Ingredients:
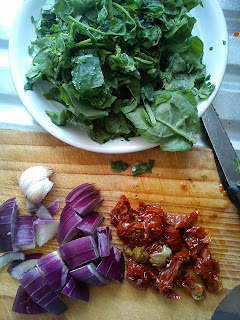
200 grs whole spinach leaves
½ a medium red onion - roughly cut
2 garlic cloves - minced
Salt & Pepper
8 pieces of sundried tomatoes - finely chopped
25grs dairy free butter
3 whole raw hazelnuts and 3 whole raw almonds – finely chopped


Method:
In a deep pan, melt the butter and brown the onion and garlic for 2 minutes.

Add in the chopped sundried tomatoes and the chopped nuts stir until brown for 3 minutes on medium heat.

Now add the spinach with salt and white pepper. Mix-stir for about 3 minutes until the spinach is completely wilted.

Remove from heat and cover.

Now, time to cook your potato wedges. Just follow the instructions on the package. It shouldn’t take you more than 5 minutes to get your chips or wedges ready once the chip oil or oven is ready.

The spinach can be eaten on their own. This dish tastes as good as it looks and is full of moisture.
this tastes soooo good!
Enjoy!

Saturday, 28 September 2013

Savoury oat bran biscuits


Serving suggestion


6 ingredients needed
To make the savoury biscuits, you will need:

  • 1 glass of rice milk
  • 1 glass of oat bran
  • 2 table spoons of sunflour oil
  • 1 tea spoon of grated ginger
  • ½ tea spoon of rosemary
  • 1/ 2 tea spoon of salt
Method:
1 - in a mixing bowl, pour your oatbran and the milk. Mix well and leave it for 20 minutes for the bran to absorb the milk. After, add in the ginger, rosemary, salt & 1 table spoon of oil. Mix all well.

2 - Preheat the oven at 175 degrees for 10 minutes. In a ceramic baking dish, spray the rest of vegetable oil. Then, use a tea spoon to form your biscuits as you wish. With the
proportions above, you should obtain 18 to 22 small biscuits.
Read to bake savoury oats biscuits
3 - Put in the oven to cook for 40 minutes at 175 degrees.
Once the time is up, get the biscuits out and lay them on a separate plate to cool.
 
It is ready. You can eat it alone or served with a dip. In the picture above, it is served with a home made tomato dip. Watch out for the recipe of the dip soon on the blog.
Note: unlike normal flour, oat doesn’t rise when cooking. it is slightly compact and gummy. It therefore needs longer to cook and allow the centre of the biscuit to dry completely. Feel free to replace the ginger or rosemary with your preferred spices. 

This treat is not only great in the mouth but it is made of all natural stuff with no E numbers... get the kids involved. They will love it.
Hope you enjoyed the cookies last week. Enjoy!
 
Fresh from the oven... Yummy!